Sunday, March 13, 2016

Battling Birds

Battling Birds

A Little Background

Sitting in my backyard, decided I wanted to photograph birds at my feeder.

Approach

TIP:  More often than not, you won't nail the shot on the first try.  You'll likely take shots, make adjustments, and try again.  I'm sure any professional would even agree with this.

Initial Scene

Here's the scene via the naked eye.


Fun to watch.  Birds are great at a feeder.  If you look closely, you'll see a bird on the left side of the feeder about half way up.  However, fun to watch, not so hot of a photograph.
  • Too wide of a shot, too cluttered and busy to focus on anything.
  • Harsh light at mid-day.
  • Horrible colors.  Spring will be better, but not Spring yet. :-)

The Plan


  • Come back first thing in the morning for MUCH better, diffused light.
  • Isolate one feeding station to better focus on a bird.
  • Blur out the backdrop to remove clutter and make a bird pop even more.
    • Lower F-Stop
    • Zoom in 
    • TIP: Try scenes in other cameras, like portrait or action, in lieu of the F-Stop.
  • MAY go black and white to eliminate the horrible colors.

A Little Better

I moved my favorite feeding station to isolate it better, and leave room to catch a bird flying in.  After some experimenting, I went with f5.6 and around 150mm zoom to blur out the background.

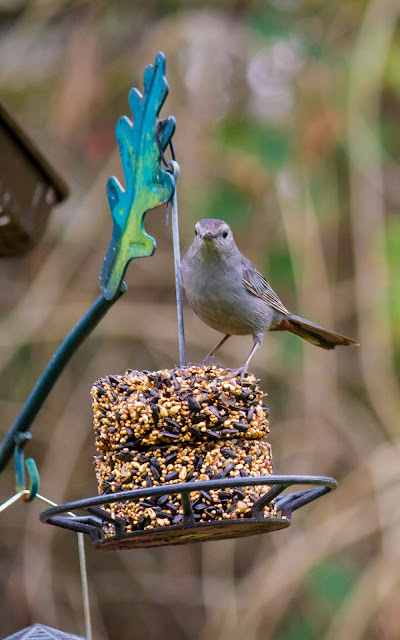
This first shot of a Cat Bird is definitely better.  I do like the eye contact which always makes for a more interesting photo.  Photo needs some finishing touches, but not quite the photo I want today.  I'll put some key words on it to help me find it later.


Patience and a Little Luck Pays Off

Sometimes you just have to be patient, and get a little lucky.  A Cardinal was at the station, and a Cat Bird decided it was his turn. :-)


Post-Processing

The photo needs some touch up, in my opinion.  The following lists my post-processing steps for the final photo at the beginning of the article.  I use Lightroom, Photoshop, and Nik, but most other photo editors offer some, if not all, of the features I used.
  • Crop the photo to remove some dead space.
  • Bumped up the Exposure a little for brightness.
  • Boost the Clarity to add crispness.
  • Boost the Saturation and Vibrance to add color pop.
    • NOTE: I rarely add Saturation, just Vibrance, but Saturation did help, to me.
  • Reduced Noise.
  • Increased Sharpness.
  • Finally, added a slight vignette to help highlight the birds.
I use Lightroom, Photoshop, and Nik, but most other photo editors offer some, if not all, of the features I used. 

Definitely more I would do for a final photo, such as:
  • Remove the feeder pieces in the lower left.
  • Remove the red flower blurs in the background (but maybe not)
  • De-saturate the green in the backdrop, or even make it gray
but this is enough for now.

What Do You Think?


  • So what do you think of the photo and my process?  Once you get used to it, this all happens very quickly, well except for maybe the patience part.  LOL
  • What would you do different?  Hey, I'm still learning too.
  • Questions?  Leave a comment.
  • Feel free to post photos and comments applicable to this article.

Related Tutorials

You can always search the web for related tutorials using Google, Bing, Yahoo or you favorite search tool, but here's a couple of relevant tutorials that include depth-of-field:

Aperture and F-Stops
Composition - How to Compose a Photo

Thanks to Mike Browne (@mike_browne) at PhotographyCourses.biz for offering, in my opinion, some of the best training videos on the web, and they are FREE. :-)

Settings

These aren't written in stone, experiment.
  • Canon EOS 7D
  • Canon EF-S 55-250mm (f/4-f/5.6 lens)
  • f/5.6
  • 1/640 sec
  • ISO 800
  • 154mm
  • RAW

My Web Sites

http://brettossman.com (photos for sale)
http://500px.com/brettossman (additional photos)

Follow Me

Twitter: @LBrettOssman
Facebook
Google Plus

Sunday, January 24, 2016

How Sharp Do Your Photos REALLY Need to Be?

Tack Sharp, Tack Sharp, Tack Sharp !!!


Everyone tells you your photos should always be tack sharp at 100% (1:1).  
But is tack sharp really necessary?
My answer is: depends.

NOTE: I'm not proposing sloppiness or bad technique, just sometimes getting tack sharp photos may prove difficult.  That can be OK.


Your photo needs to be as sharp as it needs to be, and that depends on your plans for it.  Most people aren't going to zoom your photo to 100% (1:1) or zoom at all.

Viewing Photos Electronically or Sharing in Social Media


Tack sharpness is likely the least concern in these cases.  Does the photos look sharp on your monitor?  Good enough, in my humble opinion.  One caveat: photos of items you are selling online.  Potential buyers may zoom those photos, so zoom before you post, making sure the zoom looks sharp.

Printing


Most will insist tack sharpness at 100% (1:1) for printing photos.  Again, not necessarily.  Re-size a COPY of the photo to the intended print size, and view the photo at that size on your monitor.  Don't fill the monitor.  If you plan to print a 5x7 inch photo, view it at 5x7 on your monitor.  If it looks sharp, try a test print.  Look good, great. 

Selling Photos / Entering Contests


ALWAYS strive for tack sharpness at 100% (1:1) in these cases.  If selling, people assume you are professional.  Contest judges are very detailed and, yes I'll say it, picky.  Rightfully so in both cases.

Non-tack sharp photos sales or refunds.  Not only that, you risk a bad reputation as a professional photographer. Judges, among other criteria, WILL zoom your photo to 100% (1:1), maybe more.

In these cases, learn all the techniques for getting tack sharp photos and use them: top notch lenses, tripods, camera hand-holding, focusing techniques, etc.

Achieving Tack-Sharp Photos


Here's one link on getting tack sharp photos: PhotographyCourses.biz Technical Videos. Just open the site and check off Image Sharpness.  Oh, Mike offers NUMEROUS other free videos as well as excellent paid courses, but start with the free ones.


As usual, if you have any questions, comment on this blog or email me at Brett@BrettOssman.com.

Friday, January 15, 2016

COOL Way to View Your Photos !!!

You Take Great Photos and You Want to Enjoy Them

I like viewing my photos.  I have an electronic picture frame, but frankly, I forget to turn it on and it just takes up space on my desk.  I looked into options for displaying photos on my PC.  Obviously, I can set up a screen saver to play a slide show, but I probably won't watch a screen saver.

I discovered a way to set up a slide show on my desktop display !!!

Here's a screen shot of my desktop:

My desktop changes the photo every 10 minutes.

How did I do this?

Set Up the Windows Desktop

Now, these are Windows 10 instructions, but I understand earlier Windows versions, back to Windows 7 I believe, have the same type of features.  I suspect Mac computers can do the same.

Create a folder for your desktop photos.  My folder happens to be F:\Laptop Monitor\Laptop.  Next step is to set up the Windows desktop to display a slide show.

Right click on your desktop, and click Personalize:


  • Select Themes
  • Select Theme Settings
  • Select Desktop Background
  • Set up your desktop as you wish. At minimum, set:  
    • Background to Slideshow
    • Album to the folder you created above
    • Change Picture Every: how often you want photos to change
    • I recommend Choose to Fit set to Center.
 Here's my settings.

Prepare Desktop Photos

OK, now prepare and store your photos for your desktop display. 

Don't overwrite the original photo.  Save a copy to your desktop photo folder.  You may want the original for another purpose later, like printing.

Re-size and save photos for your desktop display. 

Re-sizing isn't absolutely necessary, but I didn't want my icons on top of my photos, nor did I want Windows sizing them for me. 

As most of you will use a variety of photo editing software, I won't get into details for re-sizing.  Re-sizing, when available tends to be VERY simple, so check your photo editor.  BUT, if you need some help learning how, let me know which software by name.

For my 1440x900 laptop display, I found re-sizing to 1296x810 pixels worked great.  Experiment with re-sizing for your monitor, display and layout.  

HINT: Set up some sort of preset or automated action you can easily apply to future photos you want to include.  For example, in Lightroom, set up a Preset, or Photoshop an Action, to re-size and save future photos.

Save the re-sized files to your desktop folder. Save as a JPG/JPEG file.  IF you can set quality, try 6-8 out of 10 or mid-range.  If quality isn't an option, don't worry about it, just save JPG. :-)

Manage Slideshow Folders

Want to change the photos displayed?  Simply re-size and save new ones, or delete one from the desktop folder.  No need to mess with the desktop settings anymore.

Any questions or help I can offer, let me know.


Thursday, December 24, 2015

Speed up Adobe Lightroom Imports

If you are like me, your Lightroom imports can take forever.  Not all of us can afford high-end computer hardware to resolve this.  I came up with a process to speed up imports on MY computer.

Not getting into detailed how-to instructions here.  There's plenty of tutorials on the Internet, and many are FREE.  Try this one from Anthony Morganti: Lightroom 6 / Lightroom CC Training Videos.  He has videos for other version as well

However, please contact me if you need more help.


  • Perhaps the best way to speed up imports is to import only photos you want to keep.  Some photos are just horrible, so why keep them? Note on the Import screen I unchecked several photos I don't want to import.  The fewer files to import, the faster the import.
  • In the File Handling section on the upper right, Build Smart Previews and Make a Second Copy can both take a large amount of time.  I always recommend a Second Copy as a backup, but you can Build Smart Previews later, if you even want them.
  • Setting fewer options manually will obviously save setup time.  
    • Make extensive use of presets for anything you typically do to any photo, such as Develop Settings, Metadata and an overall Import preset containing all of the above.
      • Make Develop presets in the Develop Module.
      • Make Metadata presets in Library Module.
      • Select these presets for an import in Apply During Import  on the right hand side.
    • Set any other options on the import screen you will typically use, such as Location, Add to a Collection and Keywords.
    • Now create an overall Import preset in Import Preset for all the above on the bottom center of the import screen.
    • On future imports select your Import preset, again, at the bottom center.
      • Note that after selecting your Import preset, you can still change any of the settings for a specific import
      • You can also create multiple presets, if that helps.
Finally, run a long import when convenient, like overnight.

NOTE: Even though an import runs in the background, it can bog down your entire computer tremendously, so keep that in mind.  Frankly, I would close down all other programs when importing.

I'll be glad to let you know my personal preset settings, but that's outside the scope of this blog.

However, if I get enough requests for these settings, I'll do a blog post on those.

Hope these few simple ideas will help.

Happy Holidays

Sunday, December 6, 2015

Brett Ossman Photography November 2015 Newsletter


Brett Ossman Photography Newsletter
December 2015

Check out my website at BrettOssman.com

Thank you for reading my newsletter. Hope you find something useful and/or interesting.  Please feel free to send me a note with any suggestions, and/or comments.

Join My Mailing List
to receive every issue in your email.
No worries, you can cancel at any time.

First Things First

The coupon below is for any of my photography products.  This coupon is valid through the end of December 2015.  Simply apply the code below, on checkout, to any purchase:
 
CHXJSD

With the range of products available from prints to greeting cards to throw pillows to shower curtains, and more: the discount will depend on the specific product(s) purchased.

What’s Happening at Brett Ossman Photography
 

I added links to my various social media sources such as twitter, Facebook and more.  Want to check them out and possibly follow any of them?  Click on this Contact Me link for my website.

I'm also doing extensive marketing research to help this business.  Click the previously mentioned Contact Me  link, and let me know if you would ever consider purchasing fine art photography online and why.  I'm not referring to stock photos, but rather framed wall hangings, that sort of thing.

Wants some great photography tips, check out my blog: Brett's Photography Tidbits

Photo Spotlight

Want it? Just click it!


From the Alafai Rendesvous in Florida, January 2015.

Interested in any specific subjects, themes or styles let me know.  Not only do I have photos For Sale on my website, but many more on my Viewing page that simply haven’t made it for sale yet.

My photography tastes are eclectic.  The old adage “Variety is the Spice of Life” definitely applies to me.  If you aren’t sure what you want, check out my site for a diverse array of photos.  Hopefully, you’ll get some ideas.


Hot Tip

What is the Perfect Selfie?

Had a friend ask me about writing a blog for the perfect selfie.  Thought that was an interesting idea, so click the above link to see mine.

Featured Artist
Georgia Brushhandle

I like to create art using Oils and Pencils, and I also dabble a little in photography..

My art has been featured on the Artist's blog at
http://www.theartisticblog.com/ArtisticBlog/?p=13692

You can find me on Facebook at https://www.facebook.com/Brushhandles

Also on Twitter at https://twitter.com/BrushhandleArt

I hope you browse my images, and enjoy what you see. :)


Thanks again for reading my newsletter, and don’t forget to Join My Mailing List

Sunday, November 15, 2015

What is the Perfect Selfie?

Had a friend ask me about writing a blog for the perfect selfie.  Thought that was an interesting idea, so here goes mine.

Current State of the Selfie

Let's face it, most selfies I see are nothing special really, from a photography standpoint.  People have been shooting photos of themselves for decades or longer.  They put their camera on a tripod, set a timer or grab a remote shutter, go get in place, and shoot.  To me, the term "seflie" is just a new fad name.  Although, I guess they do tend to be facial closeups.

Why Shoot a Selfie?


A selfie is just another photo, no more, no less.  Just like any photo, the first question is: "What do you want to accomplish?"
  • Do you simply want to put your face on social media, such as Instagram, Facebook, Google+?
  • Do you want a nice portrait?
  • Do you just want family and friends to see a recent photo of you.
  • Do you want to be funny?
  • Do you want to capture a moment?
  • Do you want some sort of response and reaction and what?
  • Do you want something outside the norm, special effects, be different?

The Approach

To me the approach to taking a selfie is no different than shooting any other photo.  Want a nice selfie, think it through a little.  You don't need to use a professional type approach, unless you want to.  In fact, I recently posted an article: Three Easy Casual Photography Tips that apply to selfies as well as any other photo, so go check that out.

Also, try to be creative, so the response is more than, well there's another selfie.

Different Spins on Selfies

Self Portrait


To me, this isn't really a quick selfie like those you commonly see.  Get a nice clean scene or backdrop.  Set your camera on a tripod.  Use a camera timer or remote shutter release.


Casual Snapshot


Hey, just fire away, but try to make the photo somewhat interesting.  Maybe add something cool or different.  Nothing fancy here.

Funny Photo

Remember, funny is subjective and in the eye of the beholder.  So, don't be offended if you don't get the response your were looking for.  MAYBE, one way to be humorous is to do a composite, pasting two photos together.  Again, everything is subjective.  This one is VERY subjective. LOL


Special Effects

The above photo definitely fits into this category.  But here's a few more ideas.

Reflections


Long Exposure


Props


Of course, the main idea is to have fun. :-)

Friday, November 6, 2015

Quick Tips for Anyone with a Camera - Where did I Put that Photo?

OK, so you've taken a bunch of photos, maybe hundreds or even thousands.  Then one day you want to find one of them, or you want to post them online so someone else can find them.  Odds are the folder, directory or file name aren't going to have all the combinations one would ever search for.

This is where keywords come in, and you can put them into any photo you want. For Windows folks, you can even right-click a photo and add them, but any photo software probably has an easier way.

Take, the following photo.


There could be any of a number of reasons one would want to see this photo:
  • For a contest: rest, relaxation, beach, ocean, Atlantic Ocean, people, etc.
  • Mom remembers a photo of a beach with a lifeguard stand that she wants
  • I want to put it on a sales site and set up for anyone to search for it anyway I can think of
Try covering all that in a folder or file name.

How would anyone find it, especially months or years down the road.  Sure, you could scan through a folder of hundreds or thousands of photos.  That will likely be a lesson in futility, at best, assuming one finds it at all.

I use Adobe Lightroom CC, so, just for the sake of example, I'll demonstrate with it.

I set up a grouped set of keywords in categories.  This makes it very easy to QUICKLY scan through the keywords, and click off the ones I want (no typing, guessing, or remembering).  Each group contains sub-groups and keywords.


The entire list is attached in the link below and can be imported into Lightroom, and maybe other programs.

Here's the keywords I applied to the above in less than a minute:

Atlantic Ocean, Beach, Blue, Brown, Colorful, Flagler Beach, Florida, Gray, Grey, Lifeguard, Lifeguard Stand, Outdoors, Nature, People, Playful, Playing, Recreation, Red, Skin Tone, Swim, Swimming, Water, White, Yellow