Battling Birds
A Little Background
Sitting in my backyard, decided I wanted to photograph birds at my feeder.Approach
TIP:
More often than not, you won't nail the shot on the first try. You'll
likely take shots, make adjustments, and try again. I'm sure any
professional would even agree with this.
Initial Scene
Here's the scene via the naked eye.
Fun to watch. Birds are great at a feeder. If you look closely, you'll see a bird on the left side of the feeder about half way up. However, fun to watch, not so hot of a photograph.
- Too wide of a shot, too cluttered and busy to focus on anything.
- Harsh light at mid-day.
- Horrible colors. Spring will be better, but not Spring yet. :-)
The Plan
- Come back first thing in the morning for MUCH better, diffused light.
- Isolate one feeding station to better focus on a bird.
- Blur out the backdrop to remove clutter and make a bird pop even more.
- Lower F-Stop
- Zoom in
- TIP: Try scenes in other cameras, like portrait or action, in lieu of the F-Stop.
- MAY go black and white to eliminate the horrible colors.
A Little Better
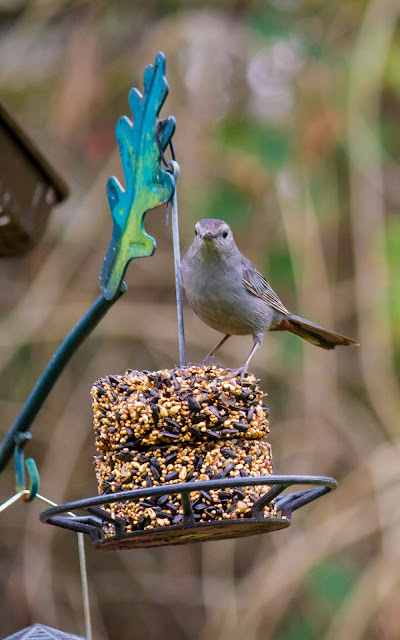
I moved my favorite feeding station to isolate it better, and leave room to catch a bird flying in. After some experimenting, I went with f5.6 and around 150mm zoom to blur out the background.This first shot of a Cat Bird is definitely better. I do like the eye contact which always makes for a more interesting photo. Photo needs some finishing touches, but not quite the photo I want today. I'll put some key words on it to help me find it later.
Patience and a Little Luck Pays Off
Sometimes you just have to be patient, and get a little lucky. A Cardinal was at the station, and a Cat Bird decided it was his turn. :-)Post-Processing
The photo needs some touch up, in my opinion. The following lists my post-processing steps for the final photo at the beginning of the article. I use Lightroom, Photoshop, and Nik, but most other photo editors offer some, if not all, of the features I used.- Crop the photo to remove some dead space.
- Bumped up the Exposure a little for brightness.
- Boost the Clarity to add crispness.
- Boost the Saturation and Vibrance to add color pop.
- NOTE: I rarely add Saturation, just Vibrance, but Saturation did help, to me.
- Reduced Noise.
- Increased Sharpness.
- Finally, added a slight vignette to help highlight the birds.
Definitely more I would do for a final photo, such as:
- Remove the feeder pieces in the lower left.
- Remove the red flower blurs in the background (but maybe not)
- De-saturate the green in the backdrop, or even make it gray
What Do You Think?
- So what do you think of the photo and my process? Once you get used to it, this all happens very quickly, well except for maybe the patience part. LOL
- What would you do different? Hey, I'm still learning too.
- Questions? Leave a comment.
- Feel free to post photos and comments applicable to this article.
Related Tutorials
You can always search the web for related tutorials using Google, Bing, Yahoo or you favorite search tool, but here's a couple of relevant tutorials that include depth-of-field:Aperture and F-Stops
Composition - How to Compose a Photo
Thanks to Mike Browne (@mike_browne) at PhotographyCourses.biz for offering, in my opinion, some of the best training videos on the web, and they are FREE. :-)
Settings
These aren't written in stone, experiment.- Canon EOS 7D
- Canon EF-S 55-250mm (f/4-f/5.6 lens)
- f/5.6
- 1/640 sec
- ISO 800
- 154mm
- RAW
My Web Sites
http://brettossman.com (photos for sale)http://500px.com/brettossman (additional photos)
Follow Me
Twitter: @LBrettOssmanGoogle Plus


I like the way you explain how you got your shot - what steps you took. Good hints! :)
ReplyDelete